After 28 Years, a New Blanket

When I was 8 years old, my Grandmother bought me a cuddle wrap, basically a blanket that could be zipped up and snapped around you. I remember being able to walk around in it when all the closures were done up.

For the past 15 years, it has been on my bed every single night.

Today I took it off and slowly threw it in the trash. It was long overdue. The zipper had broken years ago. The binding had come off in more than one place. Several spots in the middle of the blanket were threadbare.

In its place, I laid down a new blanket.

If you guessed by the colors that I made it, you’re right.

The fabric is called minky and it’s as soft as baby bunny fur. Well, maybe that’s an exaggeration, but it’s still very soft. It came from my stash. More specifically, it came from the stash my MIL gifted me. The color is a lovely, vibrant kelly green. The red satin binding also came from my stash. If the red binding hadn’t been in my stash, I’m not sure it would have occurred to me to use a contrasting color. I’m so glad it was because I love the combination.

For tips on how to add satin binding to a blanket (as this was my first time using satin binding), I watched this YouTube video. Though my corners are quite as nice as hers, I’m still pleased with the final result.

Think it can last 28 years? I’ll be putting it to the test, you can be sure.

Dress Alterations

Over the weekend, I finished altering a dress for a friend.

I’ve altered dresses for myself many a time, but this was the first time I had altered a dress for a friend since a dear friend’s wedding 12 years ago.

As always, I talked over my sewing plans with my neighbor, who was a seamstress in her day. She convinced me to leave the excess fabric in the seam allowances just in case the dress needed to be altered again. Once trimmed, the fabric is gone forever. So, I left the extra fabric in the side seams, but still trimmed the shoulder strap, so it wouldn’t be too bulky.

It was fun to work on a dress without having to labor over it for 4 months and ignore my family for the last 2 weeks.


(Elly wanted in on the photo shoot).

Now to tackle the pile of jeans on my ironing board and the massive amount of fabric required for the curtains.

Next Sewing Project: Curtains

Winter is coming.

The lovely sheer curtains I made for the living room windows were great for the summer. They let in so much light.

They also let in a ton of warmth thanks to the southern exposure, but the AC worked hard to keep us cool.

Although the boiler could keep us warm in the winter, money could be saved if I added another layer or two to the windows. Plus, more curtains will keep me from uncontrollably shivering every time I glanced at the windows and saw only a thin layer of organza separating me from the ice and snow.

The fabric chosen for the living room coordinates with the red in my beloved fireplace.

Yet, the white background color keeps the curtains from being too dark, my main complaint of the original draperies.

The curtains will be lined with warm, heavy flannel. I’ve used flannel in all the previous window dressings made and it does a great job in blocking the bitter cold air that seeps in through the window panes.

Red grommets will be used to hang the curtains. I wanted something that would allow the curtains to be pulled aside easily and still look casual.

Now to go pick up my machine from the shop. After all the dress sewing, it was in need of a tune up.

The Dresses

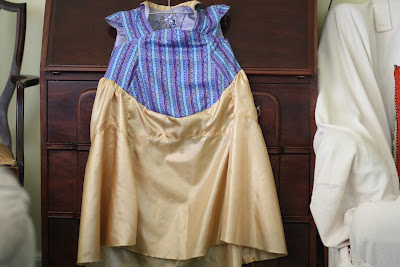
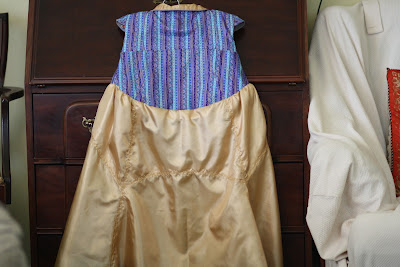
Each dress brought its own challenges to the table.

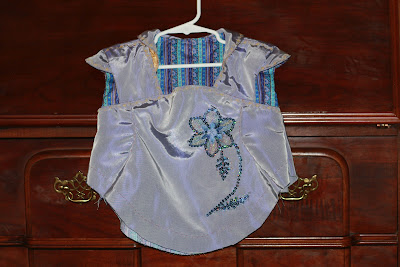
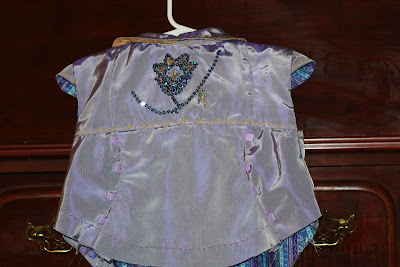
Elly’s dress was the dress of a thousand curves.

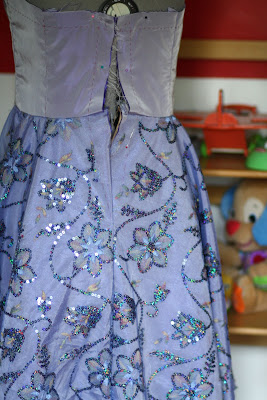
To ensure accuracy, I hand basted each curve before zipping it through the machine. Only the straight side seams of the skirt were not hand basted first. Although it took extra time up front, it was worth it because it kept the slippery taffeta fabric from shifting and potentially ruining the gentle curve of each seam. Once sewn, the curves had to be clipped, notched, pressed open, pressed up and then topstitched. It was a lot of work, especially when you realize that this dress is completely reversible so everything had to be done twice. The one shortcut I did take on this dress was to not finish the seams. I am normally a stickler for finishing seams, but I saw no point in doing it on this dress. Nobody is going to see them. The tulle in between the skirts even hides the hem.

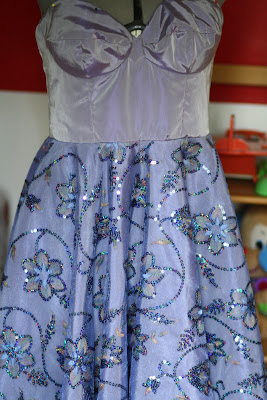
My dress was the dress of a few thousand hand stitches.

The purple taffeta fabric was hand basted to the cotton underlining. The bodice lining was hand stitched to the outer shell. The waist stay was hand stitched to the bodice. The hem was hand stitched down. At one point, I had blood on my fingertips from all the needle punctures.

Hands down these were the most complicated dresses I have made to date. Together they took over 4 months to make.

Elly’s dress was completely underlined. It made the taffeta easy to work with and it made it strong enough to withstand the hand sequin work and the oodles of embroidered topstitching. On the other hand, only the bodice of my dress was underlined; the circle skirt was left free.

My dress was a compilation of 2 patterns. The bodice was from Gertie’s Bombshell dress class on Craftys. The circle skirt was from The Party Dress book. Amazingly, the patterns matched perfectly.

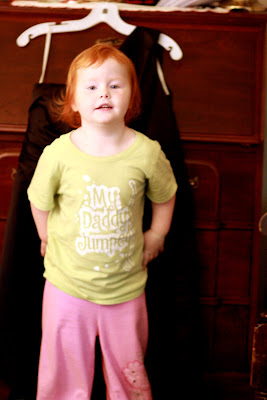
Elly’s pattern came from Sewing Clothes that Kids Love book. It’s the Manhattan pattern.

Slight fitting adjustments were made to both patterns. Otherwise, I followed the directions as directed.

To make beautiful dresses, you need beautiful fabric.  I didn’t skimp. The purple fabric was a bridal irridescent taffeta from Denver Fabrics. The overlay on my dress was a sequined tulle purchased on our trip to Mexico last year. The appliques on Elly’s dress were fussy cut out of the tulle and then hand stitched down. As mentioned above, I also used cotton underlining. The dresses were completely lined. Cotton was used in the bodice for its breathability whereas polyester lining fabric was used for the skirt for its silkiness.

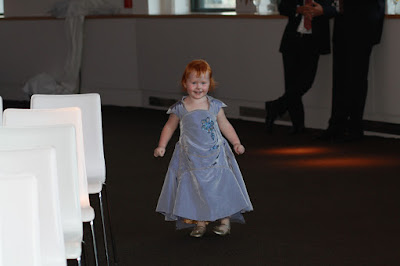
The effort was worth it. I loved the results! I loved all the compliments on how pretty Elly looked in her “princess” dress. Is that wrong?


But now that the dresses are done, I plan to take a well deserved break. I just want to sit, drink a glass of port and play a board game with Dan in the evening rather than rush to squeeze in another hour of sewing.

Dress Update, Final Days

A small celebration, by way of a trip to Friendlys, took place this weekend in honor of Elly’s dress being completed.


No sooner had it been completed, I turned my attention to my own dress. Thankfully, it’s a much easier dress to construct.

Or rather, all the fiddly details, like the steel boning, have already been completed. All that is left to be done is add a zipper, install the bodice lining and hem the dress.

Unfortunately, sickness is slowing down my progress. Elly hasn’t been sleeping well and the night is when I usually get most of my sewing work done.

Tomorrow Elly will go play at a friend’s house and I will get 3 hours of uninterrupted time. Here’s hoping it’s all I need.

(Full details of Elly’s dress as well as my own will be published after the wedding).

Dress Update, week 2

The lining for Elly’s dress is finished!

The bodice was made with a medium weight cotton. The skirt was made with a lightweight polyester lining fabric.

Despite the fact that nobody outside the few who read this blog will see the inside of the dress, I took the time to hand baste in the skirt sections and to topstitch with the fancy flower motif. One day, she may want to wear the dress inside out.

Now she can.

Update: Dan mentioned that the inside of the dress resembled a Snow White dress. So, you might be looking at Elly’s Halloween outfit. What do you think?

Repair or Replace

3 years ago, I came across a “Free. Works.” sign on a sewing machine.

Despite its heft, I hauled it home humming the whole way. I cleaned and oiled it until it purred like a cat.

Since that day, I’ve sewn quilts, sheer curtains, aprons and bags on it.

It’s a wonderful machine, a Kenmore 158.14100, but it’s been broken since the day I got it.

Despite having settings for zigzag, overlock, and decorative stitches, the only thing it can do is run a straight stitch. Mind you, it does that very well unless you’re trying to sew through 2 or more layers of jeans.

Yet, I’m greedy. I’d like it to work properly. My local sewing store informed me that it would cost me $60 to just look at it. Presumably, it will be much more than that once they start replacing parts. I can buy a new machine for that amount of money. Oh, if only I lived next to Peter. He would know what to do.

So, it begs the question. Do I repair this oldie but goody? Or do I replace it with another machine that actually works?

You might be wondering why I should replace it at all, yes? I do after all have perfectly good machine, a Babylock Decorator’s Choice, which I purchased 2 years ago.

Well, I’m afraid I’ve gotten spoiled by having two machines. It’s nice to have a machine dedicated to each project that I’m working on. It keeps me from having to change the thread in the machine out, change the settings on the machine and change the needle. Plus, the old machines are great to use when Elly wants to help. There aren’t a million buttons for her to press.

Maybe I can convince my neighbor, who was a seamstress in her day, to give me her old Singer.

A Sewing Bench

Six years ago, I drug a chair home from a local consignment store to use in my sewing room.

It was the perfect height.

Yet, the more I sewed, the more I grew to realize it was not the perfect sewing chair.

The back of it was just in the way.

In order to reach any tools or notions that were behind me, I had to stand up. Besides I never used the back for support. It was decorative only.

The seat of the chair was too wide and couldn’t slide underneath my sewing cabinet, forcing me to lean forward and hunch over my sewing machine.

The chair was crooked.

Thus, for some time, I have been hunting for a replacement. Every chair I looked at though had at least one of the same problems. Maybe a chair wasn’t what I wanted after all.

So, when I stumbled across a picture of a sewing bench, it was love at first sight. The tricky part was finding one for sale. Etsy pulled the rabbit out of the hat for me.

The height is perfect. The width is perfect. For added bonus, not only is the seat cushioned but it also lifts up to reveal storage.

Now I can get some major sewing done on Elly’s dress in comfort.

Ribbon Storage

I’ve thrown them in a drawer. I’ve stacked them on a table. I’ve bought plastic containers to hold them only to have the containers break when dropped.

Nothing worked for very long. All the solutions tried either ended taking up precious counter space or were hidden away where I couldn’t see them.

So, when I saw the Cottage Home’s ribbon holder tutorial, I flipped and promptly asked Dan to build me something just like it.

And he did.

No supplies were purchased. He just used what we had on hand: 1 dowel, 1 scrap piece of wood, 1 crystal door knob and some nails.

It’s not as pretty as the one featured on the Cottage Home blog, but it suits me fine. Plus, there is room for growth. Or rather there is room for me to unearth all the ribbon stashed in drawers and add them to the ribbon holder. I just need to accumulate more spools or use up the ribbon on display, whichever comes first.

Elly’s Bodice Completed

Not to toot my own horn here, but can I tell you how pleased I am with how the bodice came out?

It’s better than I imagined it would be.

Sure it was annoying with the 14 pattern pieces that had to be stitched together and not one of them being a straight edge. It was further exasperated by the fact that I hand basted all the seams first because I didn’t trust my machine or my sewing ability to keep the seam lines matched up.

Yes, it took me forever to hand tack the flowers and leaves to the taffeta fabric. It also took twice as long as running a straight stitch to add in the fancy gold flower motif that you see on all the edges.

But who cares? Machiavelli, baby! The end justifies the means.

Now to sew up the skirt.