Homestyle Asparagus and Bacon

Article first published as Homestyle Asparagus and Bacon on Blogcritics.

When trying out a recipe I found in one of my cookbooks or online, rarely does my version look as pretty as the accompanying picture. Case in point:

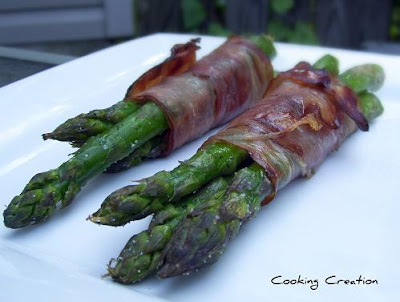
I found a recipe for asparagus wrapped in prosciutto on Cooking Creation blog. Her picture of the asparagus looked like this.

Mine came out looking like this.

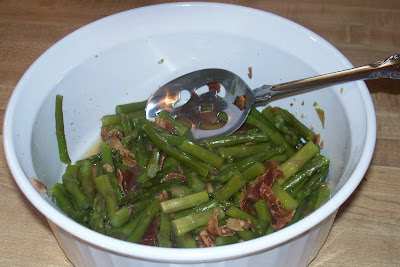
In my defense, there are a few reasons my version looks uglier.

1. The heat index was over 100 on the day I tried this recipe out. Dan vetoed standing in front of a hot grill. I was equally opposed to standing anywhere near a pot of boiling water. I steamed my asparagus in the microwave. In order to fit the asparagus into a microwave-proof dish, I first had to cut it up.

2. Not having prosciutto on hand, I used bacon. Obviously I had to cook the bacon first, but I wasn’t about to saute it over a hot stove (see reason #1). I threw the bacon in a 375 degree oven and then went and sat under the AC in the living room. Well, the bacon cooked a bit longer than it should have, so I ended up with crumbled bacon rather than lovely strips.

3. Homestyle cooking is all about comfort. Let the restaurants serve fancy dishes that look more like a work of art than something you would eat. I’ll stick with my dishes than can be eaten in shorts, t-shirt and no shoes.

My hat goes off to Cooking Creation, asparagus and bacon are a wonderful combination of sweet and salty. In a word, it was delicious. Even Dan who isn’t a fan of vegetables, cleared his plate.

Since my version is quite different from the original, allow me to share it with you:

1 bunch of asparagus, cut into bite-sized pieces
5 strips of cooked bacon, crumbled
2 tablespoons of water
salt and pepper to taste

Place the asparagus into a casserole dish. Pour the water and bacon overtop. Cover the dish and place in the microwave. Cook for 3 minutes. Stir. Cook for 3 minutes more or until tender. Season to taste.

Elly and I Hate Being Idle

We thought it was a phase that she would grow out of. More accurately, we were hoping it was a phase that would only last a month or two. Elly is almost a year and a half old and she still hates riding in the car for longer than 20 minutes.

On Saturday, we drove to a friend’s house to celebrate their daughter’s 2nd birthday. Elly fussed on the way there after quickly growingbored of her musical frogger and other toys I had packed. Once there, she had a great time running around and playing with the other children. Most children would sleep after such an outing, but not Elly. I can count on one hand how many times she has fallen asleep in the car. Rather than sleep, she strained against the straps to her car seat desperately trying to get out.

I know how she feels.

I hate sitting still with nothing to keep my hands busy. Thankfully, I can knit, which is exactly what I did. I cast on for the hexagon afghan.

Once Elly is old enough, I’ll teach her to knit. With a little luck, it will make her enjoy car rides more.

Hiding Indoors from the Heat

Last week it was too hot to play in the garden. After biking to the local splash park for two days in a row, I needed a break. So, on Friday we stayed home. It seemed like the perfect excuse to try out a craft idea I found on BabyCenter’s website: finger painting.

2 tbsp flour
2 tbsp and 1 tsp water
food coloring

Mix the water and flour together using a fork or mini whisk. If necessary add additional water, a teaspoon at a time, until you reach a good consistency for painting. Dye the flour-paint in your child’s favorite colors via food coloring.

Expect a mess.

I draped our dining room table with an outdoor plastic tablecloth. Then, I taped waxed paper to the cloth. I strapped Elly into her booster seat. To save her outfit, I hunted down Dan’s old apron. Finally, I stepped back and let the magic happen.


When she stopped painting on the wax paper and started painting the arms of the chair, I called a stop to the festivities.

Later in the day, Dan and I discussed setting up a craft area for Elly in the basement so that our dining room set might survive her youth.

Chocolate in my Homemade Bread

Article first published as Chocolate in my Homemade Bread on Blogcritics.

Never in my life have I eaten babka. So naturally I never had a desire to bake babka bread. Not until I stumbled upon Smitten Kitchen’s blog post about it that is. Her description sounded devine. How could something that called for over 2 pounds of chocolate be bad?

Of course, I didn’t follow the recipe exactly. Repeat after me: recipes are recommendations.

I made a few changes to the filling portion. The original recipe recommended using semi-sweet chocolate along with a cup of sugar. Semi-sweet chocolate is just too sweet for my taste even without adding more sugar. I prefer bittersweet. So, that’s what I used: 3 packages of bittersweet chocolate chips, ground up in the food processor. I ommitted the sugar altogether. I also increased the butter in the filling to 1 cup or 2 sticks partly because Elly mashed the stick of butter making it impossible to cut in half equally (it’s amazing how high she can reach now!) and partly because I love butter.

Here’s my version of the filling:
1 cup (2 sticks) unsalted butter, room temperature
3 packages of bittersweet chocolate chips (11 oz), chopped finely in a food processor
2 1/2 tablespoons ground cinnamon

Stir together until smooth.Then, taste it. If you think it’s too bitter, add some sugar or don’t use bittersweet chocolate. You’re the one who has to eat it. I already have my bread and I’ve eaten it too.

Though we tried to eat it for breakfast, it quickly became a dessert bread. 2 pounds of chocolate really IS a lot of chocolate. That’s not a complaint. I couldn’t be more pleased with my babka.

Outgrowing Diapers and Pull-Ups

Our little girl, whom I affectionately call Elly Belly, is not very little at all. She flew off the growth charts in weight at 3 months old when I was exclusively breastfeeding her. She remains an inch off the charts to this day. Her height isn’t far behind in the 95 percentile.

Having spent time searching the internet for answers on what to do when your child outgrows size 6 diapers and what to do when your child is gearing up to outgrow size 4t-5t in pull-ups, I thought it might be of some help to parents with chubby children if I compiled my findings here.

First and foremost, ignore the critics. The only person you need to listen to is your pediatrician. Odds are there is nothing wrong with your child.

A word about the diaper sizes:
Being a first time mom, I thought the weight range listed on the diapers were time-tested and accurate. Perhaps they are if you have a normal size child. If you have an Elly-sized child, take the weight recommendations with a grain of salt. Elly outgrew all the diaper sizes long before she reached the upper weight limit listed on the boxes.

So what does come after size 6 in diapers?
You have a few options:
1. Pampers does carry a size 7. We opted not to use them due to the overwhelming smell of baby powder.
2. You can switch over to pull-ups. I would recommend the Huggies training pants because they can tear open at the sides, which is a nice feature when your child is still having her bowel movements in diapers.
3. You can switch over to cloth diapers. I found Green Mountain Diapers to be a great resource when deciding which supplies to buy. Keep in mind that you need that same grain of salt for weight recommendations. Elly outgrew the cloth diaper covers listed up to 35 lbs when she tipped the scales at 30 lbs.

Now at 17 months, Elly is wearing pull-ups sized 4t-5t when out on the town with Daddy or when gardening with Mommy.

It’s the largest size carried by Pampers and Huggies. So what comes after pull-ups?
Again there are a few options.
1. In disposables, the next tier contains youth diapers, such as Attends Briefs.
2. Disposables offer another option: nighttime diapers. Pampers offers Underjams, diapers designed for children who haven’t mastered potty training at night. These go up to 65 lbs compared to 50 lbs with the pull-ups. But, who says they can only be used at night? Go ahead and use them during the day.
3. You can switch to cloth diapers. You’ll have a limited selection, since most AIO and pocket diapers will be too small or won’t allow room for growth. Elly is currently wearing toddler-sized pre-fold diapers with Bummis XL diaper covers. Both should continue to fit her in the coming months. However, we’ll have to switch to a different design when it’s time for potty training. I have my sights set on Happy Heinys Training Pants. They have a wide selection of sizes.
4. Switch to cloth, but use underwear. Mumtaz Soakers on Etsy offers both lined underwear, which is really for the child who is currently potty training, and nighttime waterproof underwear, which can be used during the day for the child who isn’t ready for potty training.

Of course, you could always hope that your child becomes potty trained before she outgrows the pull-ups. Unfortunately, our Elly has shown no signs of being ready for this step.

Keeping Elly Busy

On Mondays, Wednesday and Fridays, Elly and I take Jake for a walk.

On Tuesdays, we play in the garden until about 9am. Then, we pack up and head to the playground and the Splash Park.

On Thursdays, we visit the Farmer’s Market where we pick up a week’s worth of fruits and veggies along with lunch for the day.

During the week, we visit our neighbors.

Though I do a pretty good job of keeping her busy, I often wish Elly, who is a social butterfly, had more occasions to meet other kids her age. Often when I take her to the playground, nobody is there.

Where do the other Moms in town take their kids?

I haven’t tried the mall. Maybe they are all at the mall. Pity it’s such a long bike ride away.

Pet Arthur

I have a new pet.

No, it’s not a dog. Jake would never forgive me.

It’s a sourdough starter. I named it Arthur,since I purchased it from King Arthur’s online store. Despite a plethora of information on how to start a sourdough starter from scratch, my handful of attempts had yielded no success. I was in need of some hand-holding. A kit seemed right up my alley. Right I was. Already Arthur has produced 2 batches of sourdough bread.

I used King Arthur’s Extra-Tangy Sourdough Bread recipe. The only thing I changed was that I opted to use bread flour rather than all-purpose. I was in need of getting rid of the bread flour that had been sitting on my shelf for 2 months.

OK so it’s not a real pet, but I do have to feed it once a week. I figured if I named it Pet Arthur, I would have a greater chance of not forgetting about it in a month and letting it die.

Here’s hoping.

Orange and Yellow are just as Nice

The wonderful thing about indie yarn can be summed up in two words: gorgeous colors. It is rare to find the color combinations and unique dyes that the inde dyers use in commercial yarns. On the other, each skein is different which can be a positive or a negative. In this case, it’s a negative. The gauge of the blue yarn does not match the gauge of the orange yarn. Luckily, I found yarn in my stash that does match the gauge of the orange yarn: yellow Malabrigo.

The Malabrigo doesn’t jump out like the blue yarn did, but finding this yarn in my stash saves me from buying more Claudia hand painted yarn site-unseen and hoping that it will be the same thickness as the orange yarn.

Magnets and Hot Glue

I came across this tutorial on how to turn an ordinary dish into a needle nest.

What a great idea!

I searched my house until I came up with a dish that would work. Dan drove to Loews and then to Home Depot to buy me the magnets.

It took me 3 tries with my hot glue gun, but I got the magnets to stick.

Now I too have a pretty needle nest. Yay!

The Hexagon Swatch Changes Everything

The plan before I knit the swatch was to make an afghan out of 12-inch hexagons knit out of Manos del Uruguay and my handspun.

With the first hexagon finished, I’ve changed my mind on just about everything.

I love the demo colors so much that I no longer want to use my handspun yarn. Unfortunately, I don’t have enough Taos yarn for the entire afghan, so I’ll have to dig through my stash for a complementary yarn.

Knitting the hexagon and picking up the stitches after completing each section made me want to come up with a way to cut down on the need to knit so many sections and in turn pick up so many stitches. The easiest way to reduce the amount of hexagons needed to make an afghan would be to increase the size of each hexagon. Therefore, I plan to approximately double the size of each hexagon.

Knitting the hexagon also made me realize that the gauge didn’t match my estimate of 4 stitches per inch. Rather than a 12-inch hexagon, I ended up with a 9-inch hexagon.

I’m still unsure how I want to piece all the hexagons together. Should I make a circular afghan or a traditional rectangular afghan?

This exercise has made me hesitant about casting on for Elly’s blue and orange skirt. I really ought to knit a swatch first to make sure my gauge is accurate and to make sure the yarn is a good fit for the pattern. Sigh. And I was looking forward to starting it this weekend.