New-ish Pattern, a Striped Twirly Skirt

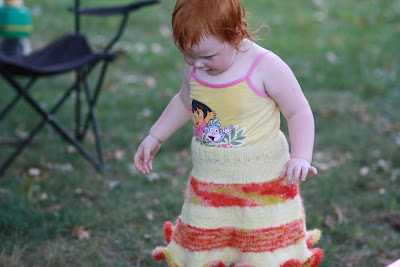
I made this skirt for Elly 2 years ago.

You can tell it has been a long time if you look at the picture of Elly wearing it. She looks like such a baby with all that chub!

Yet, it was only after finding a test knitter last year that I was motivated to complete the pattern.

While visiting the Please Touch Museum with my dear friend and my godson, I took more pictures of Elly in the skirt. My favorite picture was of Elly showing off its twirling abilities while running in circles!

The specs of the skirt:
Sizes Available:
To fit ages 3 months [12 months, 18 months, 24 months, 4 years, 6 years ] with approximate waist measurements ** [17, 17.25, 17.5, 20, 21] inches / ** [43, 44, 44.5, 51, 53.5] cm

Yarn:
MC: Malabrigo Merino Worsted [Aran-weight, 100% Merino, 210yds/190 m, 3.5oz/100gm skein] color 61 Butter 1 [1, 2, 2, 2, 3 skein(s)]
CC: Claudia Hand Painted Bouclé [Bulky weight, 78% Kid Mohair/13% Wool/9% nylon; 432yds/395m, 7oz/200gm skein] color Red Wagon; ½ [½, ½, 1, 1, 1 skein]

Needles:
US 7/4.5mm 16-inch circular needle
US 8/5.0mm circular needle or size needed to obtain gauge. Length of needle will depend on skirt size selected; also, a longer needle might be desirable for the ruffled skirt hem.

Supplies needed:
Tapestry, or blunt sewing, needle
Sharp sewing needle and sewing thread
¾-inch wide elastic (for waistband)
Large safety pin

Recommended Skill Level:
Easy (Basic stitches, simple color changes, simple shaping and finishing)

Price:
$5.00 USD

The pattern can be purchased here on my website, Ravelry, Craftsy, and Etsy.

Thank you!

Ecstatic over Ugly Paint

The two layers of white latex paint and one layer of latex-based primer have been scraped off.

The original ugly gold paint is visible again. I never thought I’d want to see it again, but I’m thrilled to have it back.

Now I can paint these walls again, but this time I’ll do it right. First, I’ll brush on a layer of oil-based primer. Next, I’ll add the base coat, a white latex paint with an eggshell finish. Then, I’ll start drawing and painting the stripes on.

It’s my understanding that once I paint over the oil-based gold paint with an oil-based primer, I can paint the stripes in either a latex paint or an oil-based paint. As I have already purchased all the paint in latex for the stripes, that is what I am using. If paint peels off again when positioning the painter’s tape,

I will just curse, cry and reach for our gallon of port – not necessarily in that order. Afterwards, I will head to Lowes and buy beadboard paneling. I don’t care that Dan hates it. No power on this earth could make me scrape paint off a wall again.


Don’t let Elly’s smile fool you, it is not fun.

Ready for Stripes

The walls beneath the chair rail have been primed and painted a boring white.

Elly helped. Remember how I recommended a shower cap for your young helper?
Well, a shower or painter’s cap is recommended for you too.


(That’s white paint in my hair. I don’t have quite that much white/grey in my hair yet though I’m working on it.)

I never needed a hat before Elly insisted upon helping. It’s clear I could use one now.

Back to my crazy stripe project.
Several of the stripes will be left white while the others will be painted yellow, green and orange.

I can’t wait to start painting the stripes. The thought of all those bright colors makes me deliriously happy.

Lots of prep work has to come first. Stripes have to be measured, drawn and taped. A painter’s cap must be obtained.

A Bigger Dining Room

In the before shot, you can see the bakers rack.

It was a gift from my father-in-law. It worked great in our old apartment, providing much needed storage in the kitchen.

It has never worked quite so well in our home. For starters, it doesn’t fit in the kitchen. So, I stuck it in the dining room. The dining room is a small room and it is made smaller by the bakers rack.

Though the shelves are full, they are full of stuff that we rarely use. Not being avid wine drinkers and being the proud parents of a very curious daughter, the wine rack is empty and will remain that way.

Yet the driving force behind my desire to relocate the bakers rack to the basement was my upcoming striped paint job. If I’m going to go through all the trouble of measuring out and painting stripes, I want people to see them.

Once I moved the bakers rack, I noticed that the wall adjacent to the kitchen doorway was long enough to house the hutch. So, I moved it. Well, now look at the room.

There is so much space!

The dining table can actually sit underneath the ugly retro chandelier. I can walk around the entire table!

And look, I have the entire long wall to paint stripes on. Oh, I’m a lucky girl!

Stripes in the Dining Room

Dan vetoed beadboard wainscoting.

Source: CTMLS, Inc


Searching for ideas on how to decorate the dining room, I fell in love with this striped idea.

Source: The Family Handyman


Can you picture stripes of yellow, olive green and orange in our dining room?

With Elly’s help, I was able to try out the idea in crayons.

The green fabric is what I’m using to slip cover the two wing back chairs in the adjacent living room. The fun and vibrant fabric will be curtains for both the dining room and the adjacent living room. Isn’t it great? I have become a fan of bright and cheerful colors. I can’t help myself.

Oddly enough, Dan is not opposed to my new plan. He thinks I’m nuts, because painting stripes is a whole lot harder than just painting it all one color. He is also slightly concerned about me adding green back to the walls when it had taken us so long to get rid of all the green in each room. The original homeowner must have loved green. It was everywhere. It’s still the dominant color in the basement.

I refuse to worry about a few green stripes taking over our house. Besides, I’m just giddy to begin painting another room. This house is starting to feel like our home and not the old home of the Elliott household.