The Versatile Cardboard Box

We order a lot online from Elly’s diapers to spices to coffee and tea. Thus, we have a never ending supply of boxes. Some are broken down right away and tossed into the recycling bin. Some are saved for future use, such as mailing presents to distant relatives.
But, this past year, I have started to find more uses for the boxes.

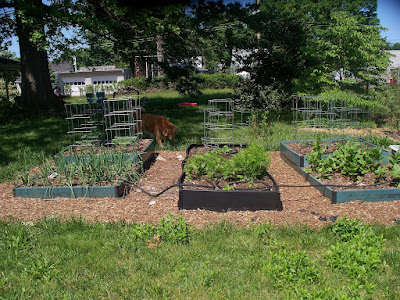
They were used to help kill the grass around my garden beds and make nice even pathways.

Once the top flaps are cut off, they have made excellent drawer organizers.

The best use by far as been in organizing my fabric.

Long have I wanted my fabric storage to resemble that of a sewing store with the fabric lined up next to each other and the colors and prints easy to see. This was as close as I’ve accomplished.

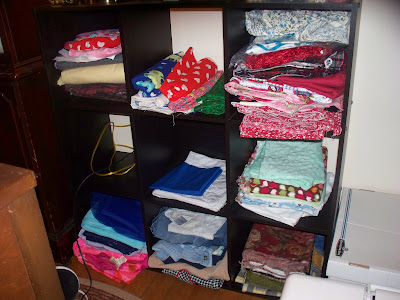
This was taken several months ago. Every open spot is taken now and it’s a bit of a mess. So, when I read a blog by The Cottage Home about how she accomplished her store-look-alike-fabric-storage, I was determined to try again. She recommended the sturdy plastic sheets from theFabricOrganizer.com. Only trouble is that they are expensive. The Cottage Home recommended comic board books as an alternative and that’s when I was reminded of my treasure trove of cardboard boxes.

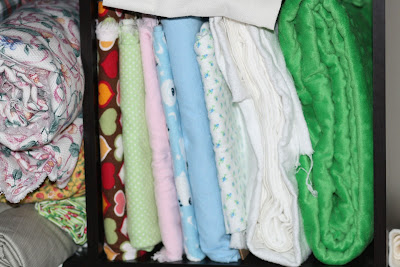
It takes a little more cutting to whittle the box down to the right size, but I like the price: free. Free is good.

What do you use your empty boxes for?

Not Quite Mrs Fix It

We have the best neighbors.

Not only did my neighbor allow me to borrow a hole saw from his collection of tools, he’s a retired handyman, but he also gave me several pointers on how to drill a hole correctly. He even drew me a diagram!

Armed with this knowledge and a hole saw, I drilled a hole slightly to the right of the original hole. I tried to go above or below like my neighbor suggested, but it was impossible to cover all the old holes and do that. The sawing of the hole went OK. Thankfully, the new doorknob covers most of my errors.

Then, we installed the doorknob.

Oh yes, Elly helped. I had to get a 2nd screwdriver and extra screws for her. She kept stealing the ones I needed for the new doorknob.

Dan came home and after telling me I was crazy to install a doorknob on a day I felt sick, he then ever so gently pointed out my error. Do you see it?

Yeah, the latch is backwards.

Dan had to reinstall the doorknob. Naturally, Elly supervised.

I blame the fever. That’s my story and I’m sticking to it.

PS. Elly and I are headed to Long Beach Island, NJ for a few days followed by a trip to family followed by a bridal shower. So, we’ll be busy. This blog will lie idle in the meantime. I’ll be back on Tuesday with lots of pictures.

Marie 

Ecstatic over Ugly Paint

The two layers of white latex paint and one layer of latex-based primer have been scraped off.

The original ugly gold paint is visible again. I never thought I’d want to see it again, but I’m thrilled to have it back.

Now I can paint these walls again, but this time I’ll do it right. First, I’ll brush on a layer of oil-based primer. Next, I’ll add the base coat, a white latex paint with an eggshell finish. Then, I’ll start drawing and painting the stripes on.

It’s my understanding that once I paint over the oil-based gold paint with an oil-based primer, I can paint the stripes in either a latex paint or an oil-based paint. As I have already purchased all the paint in latex for the stripes, that is what I am using. If paint peels off again when positioning the painter’s tape,

I will just curse, cry and reach for our gallon of port – not necessarily in that order. Afterwards, I will head to Lowes and buy beadboard paneling. I don’t care that Dan hates it. No power on this earth could make me scrape paint off a wall again.


Don’t let Elly’s smile fool you, it is not fun.

Good Ole Elbow Grease

The electric sander has not removed the white paint quickly or easily. It’s been a bit of a disappointment. Plus, Jake and Elly don’t like the loud noise it makes. So, I packed it away and went old school.

The old-fashioned paint scraper and some elbow grease removed all the paint from this section.

I try to work a little bit on it each day. Elly helps now and then. Even so, it appears it will take me a month or more to get all the paint stripped off.

Crying Over Oil-Based Paint

Assuming the original dark gold paint was just a high gloss latex, I scrubbed, sanded, and primed before adding 2 coats of a white paint for the base coat of my crazy stripe plan.

It was only after I drew all the stripes out and started to adhere the painter’s tape that I realized the original coat was a different beast altogether.

Paint shouldn’t bubble up and peel off.

It especially shouldn’t do that when I took so much time and effort to make sure it didn’t do that. Grrrr.

Come to find out it’s an oil-based paint. I used a simple test to find out. It never occurred to me – never even crossed my mind – that the high gloss was oil. Who puts oil-based paint on their dining room walls? It makes no sense.

How do I fix this problem? My local paint store advised me to sand the 2 coats of latex paint and 1 coat of latex primer off. Take it back down to the ugly gold oil-based paint. Then, prime it with an oil-based primer. It’s similar to the advice found here except for the sanding part. Afterwards, I can finally add my stripes in latex paint.

It sounds like a lot of work, doesn’t it?

Yeah. Despite being stuck indoors yesterday due to the rain, I made no progress. I dread the first step even though I have an electric sander.

The Last of the Red Curtains

Goodbye red floral curtains. You will not be missed.

I still have 2 more panels to sew of the sheer curtains, but I couldn’t wait a moment longer. It was with glee that I took the old red curtains down and cut into them with my sewing sheers. I hope to reuse the fabric when I make Noodlehead’s Go Anywhere bag. Perhaps I’ll make some pillows too just to remember the curtains by.

With Dan’s help and perhaps Elly’s help too, the new sheer curtains were hung.

Now as much as I love the new sheer curtains and I especially adore all the light they let in, I am on the hunt for new home decorator fabric that can layer overtop. Our front room faces south and gets blasted by the sun all day long. By noon, it’s like an inferno in the living room. The old shades provided much needed protection from the sun by blocking it out. The sooner I can find new fabric and line such fabric with flannel – for that is the key to weather protecting curtains – the less often we will have to run our AC.

This post was added to TDC’s June Before and After Party.

TDC Before and After

Yard Sale Find

Check out my find at the local yard sale!

Curtains for the guest bedroom.

Long have I hated the old curtains, especially after I repainted the room in a cream color a few years ago. The old curtains were just too dark and too formal and so not me.

These curtains are a touch fancy what with all the embroidery, but for $2 I’m not complaining. They save me from having to sew yet more curtains for this house at a time when I want to focus on our party dresses.

I bought 3 panels, but have only hung 2; 1 per window. I figure I can use the 3rd panel to make pillows or to make a valance. In the meantime, I’ll add it to my stash. It’ll come in handy eventually.

Ready for Stripes

The walls beneath the chair rail have been primed and painted a boring white.

Elly helped. Remember how I recommended a shower cap for your young helper?
Well, a shower or painter’s cap is recommended for you too.


(That’s white paint in my hair. I don’t have quite that much white/grey in my hair yet though I’m working on it.)

I never needed a hat before Elly insisted upon helping. It’s clear I could use one now.

Back to my crazy stripe project.
Several of the stripes will be left white while the others will be painted yellow, green and orange.

I can’t wait to start painting the stripes. The thought of all those bright colors makes me deliriously happy.

Lots of prep work has to come first. Stripes have to be measured, drawn and taped. A painter’s cap must be obtained.

Painting with a 2 year old

It wasn’t my plan to let Elly help me prime the dining rooms walls. She was just that insistent. Even my pulling out the trump card, a Tinker Bell movie, didn’t hold any sway. Elly didn’t want to watch a movie or any TV show for the matter. She wanted to help me paint.

And so she did.

It didn’t matter that Elly dripped paint all over the rug because the rug is ugly and way past the date when it should have been tossed in the garbage. In one corner, we are holding it down with duct tape. In another spot, the carpet is unraveling. And in several other spots, the carpet crackles when you walk on it. It’s that old. Goodness knows, you don’t need me to elaborate on its ugliness. Just look at it, would you?

I kept Elly in front of me on the wall we were working on. That way she could draw ‘c’s, ‘o’s and dinosaurs to her heart’s content. I followed with a paint brush and evened everything out.

It also didn’t matter that Elly dripped paint all over herself. It was easy to just toss her in the bath afterwards.

Though if your 2-year-old offers to help you paint and you just happen to own a shower cap, put it on her. Even after a long bath and a thorough brushing, Elly still has paint in her hair.

Trashing the Old Curtains

Goodbye formal pinch pleated curtains in a much too dark and too floral fabric.

Though the rods were trashed quite quickly because they were falling apart, the frugal side of me couldn’t bear to part with the Waverly fabric. It has been washed and added to my fabric stash.

Hello sheer curtains.

They are simple rod pocket curtains with a 1 inch header. This style can be purchased from Target for a few bucks. So, why did I purchase 15 yards of organza from Fabric.com? It wasn’t to save money. The price of my fabric was comparable to the ready-made drapes. No, I opted to sew curtains so I could get exactly what I wanted.

Case in point, I didn’t want curtains to open in the middle of these windows. Rather, I wanted the curtains to be one continuous panel that could easily be pulled to one side and out of the way of the AC or the incoming breeze.

It does feel a bit formal which concerns me because Dan and I are so not formal people. It takes a momentous effort every Sunday to get us out of our pajamas. You do that too, right?

The fact that I love everything else about the curtains keeps me from getting the feeling that I am living in a stuffy magazine. The shine of the fabric, the ability to see right through the fabric and the oodles of sunshine pouring through the fabric makes me smile and twirl in delight!

This isn’t the complete window treatment for the living room. Come winter we will need another layer of heavy home decorator fabric to block out the cold, but I have yet to fall in love with a fabric. I was trying out the square of yellow fabric that you can see taped to the mantle, but I don’t think it’s quite right.

Of course, I still have the large picture window in the living room to make sheer curtains for, but I couldn’t resist showing off what I’ve already accomplished. Plus, I have to boast that I hung the hardware for the curtains to the right of the mantle. It’s the first time I have done so. Dan has always done it. But after waiting 2 evenings for Dan to hang the hardware for the right curtain, I just couldn’t wait any longer. I wanted it up now. Tell me, my side looks better, right? grin.